|
|
|
Categories
|
|
Information
|
|
Featured Product
|
|
|
 |
|
|
There are currently no product reviews.
 ;
Everything is OK. Owner's Manual I downloaded ( I get link for it by email).
;
The only reason I gave this less than 4 stars, is because it shouldn't take 24 hrs to have the download available. I was surprised to find that I had to wait until the next day to be able to download the manual that I paid for.
The manual itself is the correct manual.
 ;
Excellent replacement for original Owner´s Manual. I am totally satisfied!
;
Great service. Manual is as advertised and delivered when promised.
;
Perfect quality, highly appreciated service !!!
Fast delivery of the download info, no issues at all. Recommended E-manual shop !!!
Studio Monitor Model 4318
1: Introduction
Thank you for purchasing the JBL 3-Way Studio Monitor 4318. In order to better understand and correctly use this product, please thoroughly read this Owner's Manual before using the product.
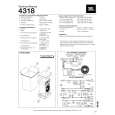
2: Unpacking
The product should have been delivered complete in appearance and functionality. However, if you find any scratches or defects, please directly contact the store where you purchased the product. We recommend that you keep the original box and packing material after unpacking. Please note that if a product must be shipped for a repair service, JBL Incorporated will not be responsible for any damage incurred during shipping caused by insufficient packing.
3: Installation
Avoid placing the monitors near power amplifiers or radiators that generate large amounts of heat, or in very humid or dusty places, and any places exposed to direct sunlight. Also place them on a firm, solid floor. �Settings Start the setup using a recorded sound source that has a distinct virtual center image. Once the center point between the speakers is obtained by measuring equal distances from the left and right speakers, adjust the distance between the listening position and the speakers, as well as the distance between right and left speakers, so that a precise center image is obtained. These monitors are designed to reproduce the most accurate stereo sound stage when the interior angle between the lines connecting from each speaker to the listener is between 40 to 60 degrees. Additionally, it is ideal that a distance of approximately 50 cm or more is maintained from the left and right walls. The center of the speaker's sound image is in the vicinity of the HF (high-frequency) unit. Set the speakers so that the HF unit is aligned at ear-level. In addition, to avoid acoustical interference with the floor surface, it is recommended that you set a sturdy base (cube or block shaped) with a thickness of 5 � 20 cm under the speakers.
4: Connection *Caution
When connecting the speakers to the amplifier, always do so after turning off the power. Connecting the speakers while the power is on may damage the amplifier or the speakers. The positive terminals of the speaker have a red ring, and the negative terminals have a black ring. Be sure to connect without mistaking the polarity. The speakers are designed so that when a positive signal is applied to the positive terminal, the woofer moves in the forward direction (positive phase operation). In order to safely and securely connect to the terminals, we recommend that you use the Y terminals or banana plugs on the cable ends.
5. Attenuator Adjustment
Independent, continuous variable attenuators are used for each unit to adjust the MF (mid-frequencies) and HF (highfrequencies) levels to the speaker's woofer level. Make adjustments appropriate to the reverb in the actual room, and to your liking. In general, for most speakers, it takes about 1 � 2 months after initial use until the unit's vibration system yields optimum performance. As the level balance is expected to initially change with use, we recommend that you readjust the level accordingly.
|
|
|
> |
|